In this second tutorial, you will learnt how to use the browser, design the led blinking application, and deploy this application.
The Realtalk class browser:
Click-left with the mouse. A menu will appear and select Open.... A second menu pops up. Select the browser menu entry. A browser shows up.
A class browser is the main tool to develop an application. This is where you create your program. As you probably feel already, Realtalk is not only a programming language, but a complete programming environment. You do not need to edit your code in an emacs/vi/... editor. All the code has to be written in a class browser.
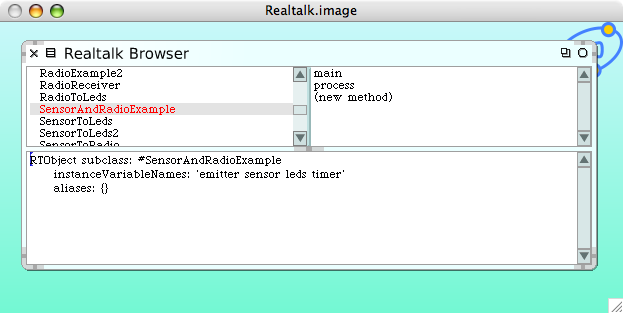
A class browser consists of three panes:
- The top-left pane contains the list of classes present in the system. A class can either represent a deployable application (e.g. RadioToLeds, SensorToLeds), or represent a sensor, the radio unit, or a timer (e.g. Timer, LightSensor, RadioEmitter).
- The top-right pane contains the list of methods contained in the selected class. As shown on the screenshop, the class SensorAndRadioExample contains 2 methods, main and process.
- The lower pane contains class and method definitions. If a class is selected, its definition is displayed (cf. screenshot). It a method is selected, then its definition is displayed.
Realtalk' syntax is a bit different from one of nesC, C and Java. The code shown in the screenshot means that the class SensorAndRadioExample is a subclass of RTObject. It defines three instances variables, emitter, sensor, leds, and timer. Note that does variables are not annotated with some typing information. Realtalk is a dynamically typed object-oriented programming language.
It is now time for you to create your first application
Creating a class:
In Realtalk, a computation is expressed only in terms of objects and message exchanges. So, creating an application necessitates one or more classes to be designed. Each class is a (direct or indirect) subclass of RTObject.
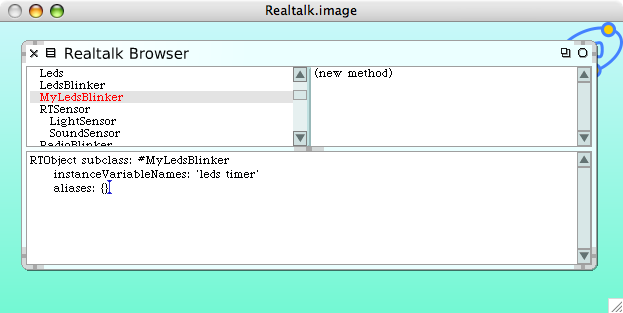
- Select the RTObject class. It is located at the top most of the list (since it is the superclass of all classes).
- Replace #NameOfSubclass by #MyLedsBlinker .
- We need to reference an object that represent leds and another one for the timer. Enter 'leds timer' after the instanceVariableNames: keyword.
- Compile the code by pressing:
- Apple-s (if you're on MacOSX)
- Alt-s (if you're on Windows or Linux)
- Alternatively, you can right-click in the lower pane and select 'do it'.
Creating the main method:
For the led blinker application, at least two methods are required. The main method define the starting point of the application. This method will be in charge of initialising the timer. The blink method will make a led blink.
To create main:
- Select (new method) on the top-right pane
- Type in the lower pane:
main
timer invoke: #blink every: 500 - Then accept the content (Apple-s or Alt-s or right-click then 'do it').
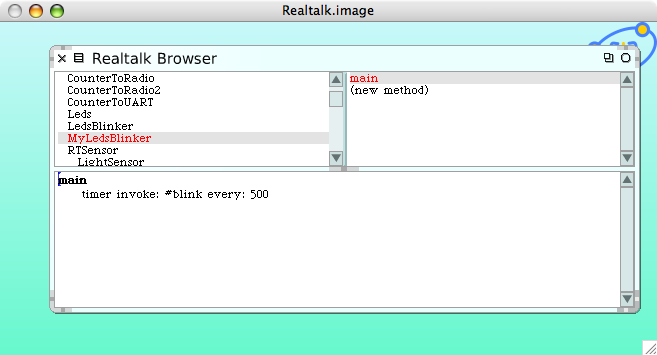
The expression timer invoke: #blink every: 500 describes a message send. The message is composed of a name, invoke:every:, with two arguments, #blink and 500. The receiver of the message is the object referenced by the timer variable. In Java, the equivalent expression would be something like timer.invokeEvery("blink", 500). Except that in Realtalk #blink is a symbol (in the sense of Lisp and Smalltalk like languages) whereas in Java there is no such construction.
This message sets the timer to invoke the method blink every 500 milliseconds.
Creating the blink method:
In a similar fashion, the blink has to be created with the following method body:
blink
timer greenToggle
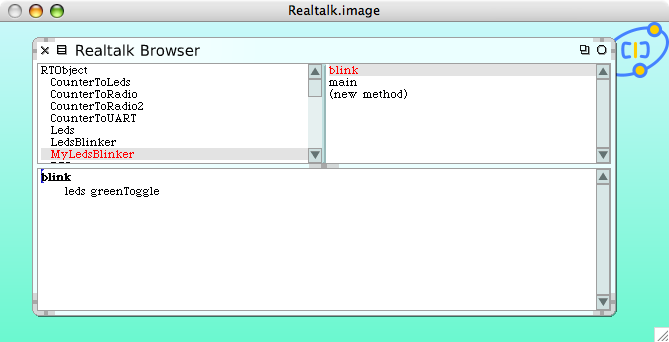
The class MyLedsBlinker is complete. It can therefore be linked with a leds and a timer component and finally deployed on the MOTE.
Link and deployment:
Right-click on the class MyLedsBlinker (top-left pane). A small menu pops up. A class can be removed by selecting 'remove'. Click on 'deploy' to make a new window appear. To deploy the MyLedsBlinker application, we need to create an instance of this class, and bind the instance variables leds and timer to instance of classes Leds and Timer, respectively.
